Publishing your own book is a lot like juggling—and not those harmless little balls either. It’s more like juggling a couple of balls, a chainsaw, a set of Ginsu knives, and a litter of kittens.
There are so many things to remember, and they’re all vital to getting your book into readers’ hands in a reasonable time frame. Drop any of those “balls,” and you end up with a messy or unfinished product that doesn’t reflect the time and energy you’ve put into it. One thing that my co-author and I started doing early in our career was creating a publication timeline for each book.
This allowed us to track the things that had to get done, plan how long each step would take, and determine a reasonable launch deadline.
These timelines have been crucial to us being able to release our books in a timely fashion without dropping any of those important balls. And seven books later, we’re still using the same template.
Today I’d like to share my process with you so you can do the same.
6 Steps for Creating a Publishing Timeline for Your Book
1. Make a list of tasks needed to publish your book.
What jobs will need to be done for your book to be published?
Some of these are universal—writing the book, revising it, designing a cover, etc.
But others will be specific to you and the kind of book you’ve written.
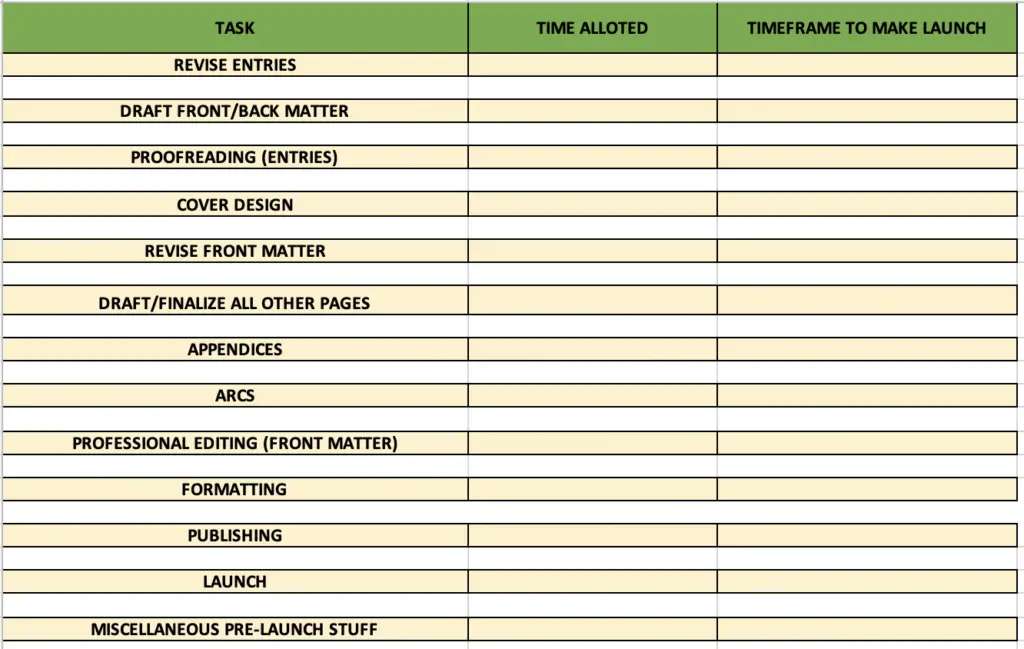
To get you started, here’s our list of Must-Dos, which can be tweaked to fit your process.
Drafting: Each nonfiction book that Angela and I write consists of two portions: instructive front matter and thesaurus entries. We tackle each section separately, so they’re listed as such on our spreadsheet.
Revision: The length for this part of the process will vary between authors and from project to project.
Professional Editing: We’ve come a long way from the self-publishing stigma that was so pervasive when we published our first book in 2012. A lot of that is due to authors recognizing the need to create a polished product. When you’ve done as much with your manuscript as you can, hire a professional to take it to the next level. Because of the unusual format of our nonfiction books, Angela and I hire an editor to tidy up the narrative front matter and a proofreader to fine-tooth-comb the entry section, but that won’t be necessary for everyone.
Drawer Time: After so much time focusing on a book, we start to lose perspective; we’re so close to it that we can no longer see the issues. To gain a little distance, we stick it in the “drawer” for a while and work on something else. Then, when we come back to it, we can give it a final read-through with fresh eyes to catch anything we may have missed.
Cover Design: Whether you do it yourself or hire someone, you’ll need to create a cover for your book.
Formatting: This is the final step in the process of creating the actual book. Again, you can do this job yourself or hire it out.
Marketing for Your Launch: What’s your marketing plan? How will you get the word out about your book? Make note on your timeline of the different strategies you’ll employ, such as crafting a launch-related newsletter, soliciting testimonials, hiring a street team, or sending out requests to write guest posts for influential blogs around the time of your release.
Publishing: Decide where you’re going to sell your books (Amazon, Apple, on your website, etc.). Familiarize yourself with their timelines so you’ll know how long it takes for an uploaded file to be available for purchase. This will ensure that your books can be bought at the various distributors by your launch date.
Miscellaneous Pre-Launch Stuff: There are lots of nitpicky tasks that need to be done before your book goes live: writing blurbs, updating your bio, adding the book to your website bookstore, obtaining an ISBN—all the little things that don’t fit into bigger categories. Dropping them into a Miscellaneous section on your timeline is a good way to remember them so they don’t creep up on you.
Other Considerations: Our spreadsheet isn’t comprehensive; it excludes a lot of common tasks such as obtaining feedback from beta readers and setting up preorders. And that’s fine. Everyone’s process is different. As you set up your own timeline, you can include anything we’ve omitted and remove the tasks that aren’t necessary.
Once you’ve created your list of tasks, put them into a spreadsheet, as follows. Then you’re ready for the next step.

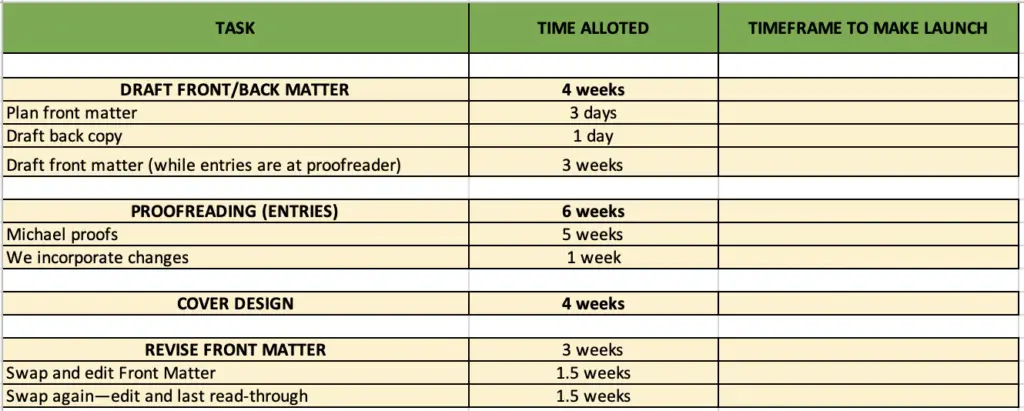
2. Split tasks into subtasks.
Some jobs will require multiple steps. You want to note these under each task so you don’t forget them.
3. Assign time estimates for each task and subtask.
If you’ve written books before, you’ll know how long it will take to draft, revise, and the like.
If this will be your first time, make your best guess; you can always adjust, as long as you’ve added enough buffer into your overall timeline (more on that later).
For tasks that will be handled by others, decide early on who you’ll be working with.
Ask them in advance how long they’ll need to complete your cover design or format a project like yours.
Add time estimates for each task and subtask to your spreadsheet.

4. Order your tasks.
Most of the steps to publication go in a logical sequence: drafting, then revising, then formal editing, etc.
But some jobs can overlap.
For instance, you may decide to do your cover design or beta reading during that important drawer time.
You might be able to start some marketing incentives while the book is still being formatted.
Arrange your tasks so you can see the order in which they need to be accomplished.
5. Decide on a launch date.
Now that you know the tasks you’ll be handling and how much time is needed for each, you can decide on a release date.
Add up the time allotted for all the tasks to see how much will be needed overall.
Then get out the calendar and choose a launch date that will give you enough time to do everything on your list.
Be sure to plan around family vacations, holidays, big work projects, and any other events that would make it difficult for you to focus on your launch.
One other thing you’ll want to factor into your timeline is what I like to call Buffer.
No matter how carefully you plan, things go wrong.
Your cover designer goes out of business and you have to find a new one; beta feedback requires you to make major changes; a pandemic breaks out and your proofreader has to work with kids underfoot, which takes longer than expected …
Trust me, you will need more time than you think you do, so add some buffer into your timeline.
You won’t see it on our sheet because I don’t physically add a line item for buffer; I just add an extra 3-4 weeks to the overall time frame and choose a launch date with that in mind.
This may sound like overkill, but we’ve always needed at least some of that buffer for every release.
And if you end up finishing ahead of schedule, great.
You’ve got some time to breathe before jumping into your marketing campaign.
6. Work backward to assign time frames to each task.
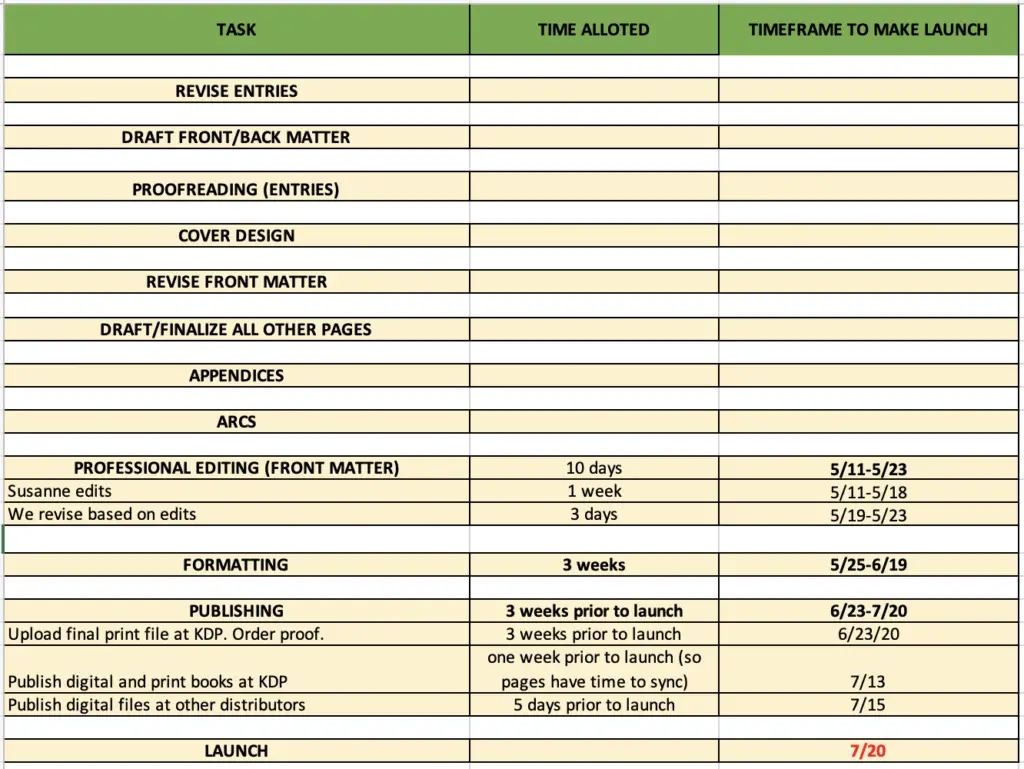
Once you’ve got a launch date in mind, work backward from that date to fill in the time frames for each task so you’ll know when each one needs to be done.
For our latest publication of The Occupation Thesaurus, we needed about 4 1/2 months, including buffer, so we decided to shoot for a release date of 7/20.
The item on my spreadsheet that’s just prior to launch is Publishing.
Seeing that I have to upload and publish my digital files at various distributors five days before launch, I plan to do that on 7/15.
Next, I’ve got a note that my Amazon files should be published a week before the release date, so I’ll do those on 7/13.
Print files have to be uploaded even earlier, because I have to order a proof and make sure the paper copy looks good.
I allot three weeks for that (in case anything goes wrong and I have to make changes and order a second proof), so I plan to upload the print file three weeks before launch, on 6/23.
That takes care of all the publishing tasks.
So I move up to formatting. My formatter needs about three weeks, so I plan to get her the material on 5/25 in the hope that I’ll have the finished files by 6/19.
Then I move on to the task that comes before formatting …

In this way, work your way backward until you’ve assigned dates for all the tasks.
This process will tell you when, at the latest, you should start working through your list so you’ll be done in time for your launch. And it acts as a schedule to keep you on track as you go.
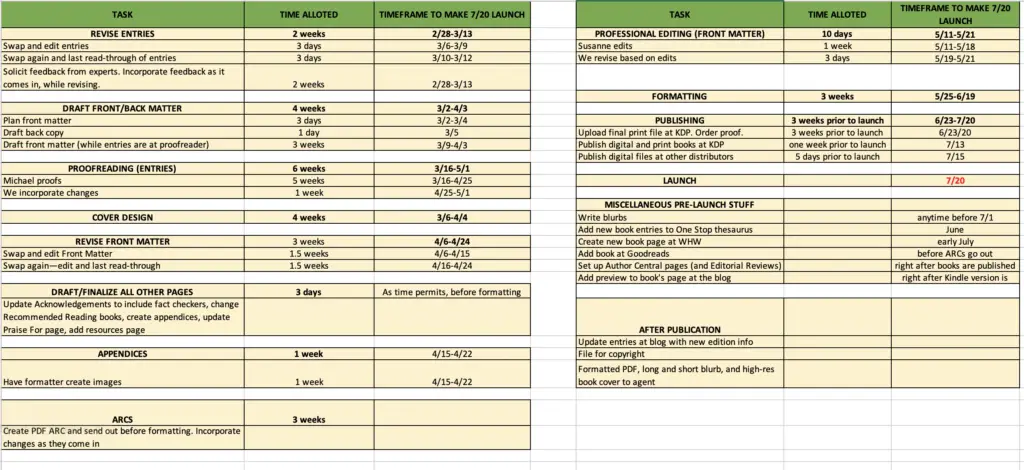
Here’s what ours looked like for this latest publication:

This may seem like a lot of work, but it’s worth it because you only have to do it once.
Then, when it’s time to publish your next book, the spreadsheet is there, with the necessary tasks and time frames laid out.
All you have to do is adjust the dates so they fit your new launch date. It makes things SO much easier.
This sheet is also handy because it allows you to note what doesn’t work so you can make changes for the next publication.
For instance, we’ve always sent out ARCs as PDFs after the book has been formatted (so readers have the cleanest version to read).
But we’ve learned that if readers find typos and other errors that we missed, it’s too late for us to go back and remove them because the files have already been formatted.
In the future, we’re going to try creating our own PDF from the manuscript and sending out those out as ARCs before we get to the formatting stage so we can incorporate any changes before the files are finalized.
This timeline has been an absolute lifesaver for us and has made the jump to self-publishing much more manageable. And it can do the same for you.
We’d love for you to use our spreadsheet as a template and individualize it to fit your next project.
And if you have questions about the process, I’m here to answer them.
 Becca Puglisi is an international speaker, writing coach, and bestselling author of The Emotion Thesaurus and other books for writers—including her latest: The Occupation Thesaurus, which will be available July 20th. Her books have sold over 500,000 copies and are available in multiple languages, are sourced by US universities, and are used by novelists, screenwriters, editors, and psychologists around the world. She is passionate about learning and sharing her knowledge with others through her Writers Helping Writers blog and via One Stop For Writers—a powerhouse online library created to help writers elevate their storytelling.
Featured Photo by Malvestida Magazine on Unsplash


